Friday, August 16, 2013

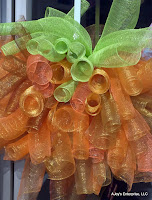
Pumpkin Time!

Deco Mesh Pumpkin Wreath
Tis coming soon, that beautiful Fall, oh how I love thee... Especially since I moved to the Carolinas=)
Anyhow, we are doing a how to make the Pumpkin Wreath Class! What fun!
I'm considering making different colored pumpkins this year, maybe purple and green or black and white??

If you can join us in September for a fun evening=)
Or, order one online from http://www.ajoysenterprise.com/wreaths.html


What color pumpkins would you make?

Sunday, August 4, 2013

Polymer Clay Mosaics

Polymer Clay Mosaic

This was a project we did at United Artisans Shop and Studio in downtown Fort Mill, SC during our Summer Art Camps with the 10-16 year old group. I think it would be fun to do at home or school, but it would be hard without a bunch of pasta machines=)

Necessary Tools:
  • Polymer Clay - varying colors - Any
  • Pasta Machine (To only be used for Polymer)
  • Dull Knife
  • Grout and Adhesive
  • Surface to put the mosaic on
  • non-food spoon
  • gloves
  • 2 Tiles (the size you want to make your design on) or Clean workspace and 1 Large Tile

Would be nice:

  • Cookie Cutters (To only be used for Polymer or crafts)
  • A pretty Frame and Backing to Seal it

To start have a clean workspace and tile, cleaned pasta machine


Make sure your hands are clean and warm up the clay in small increments and run through the pasta machine on "9". Ball up and run through again on "9".

Put your flattened sections on your workspace. Cut out squares, triangles, circles, etc...with your dull knife. If you have craft cookie cutters, those work great.

Carefully arrange the Clay cuts on your large tile, and Repeat steps for different colors. (It will be important to keep a paper towel on hand to wipe the pasta machine in between colors.)

Student keeps arranging until they are satisfied leaving about 2-3mm or 1/8" in between. Make sure they gently press the edges down so that the appearance is like flat tiles, don't press too hard to make it smash.
Note: In the design below some of her "tiles" were too close and did not fit into the final design... Make sure to leave space in between the clay pieces.

Rachel's finished design before grout=) 

 
Rachel's Finished Polymer Mosaic


Bake the Polymer Clay on the large tile in a normal oven what the directions tell you. It will vary in the type of Polymer you get. I like Sculpey premo myself. Do not over bake !!! Toxins released= bad times! Trust me!!!=) Make sure you have the right temperature too! =)

Let the hot clay sit for a half hour and cool.

Choose a surface: a pot, wood, glass- whatever the grout and adhesive will stick to=)
Get a spoon and gloves and spread across the surface.
Remove your gloves and place the Polymer Tiles( on the large tile) you have created on your surface=) Fun fun fun!

If you do this please, please please post pictures so I can see the beautiful things you have made!!!! Have a blast creating!

Also, if you have any suggestions or questions, don't hesitate to ask=) Thanks for reading!

Sunday, February 17, 2013

Crocheted Guitar Pick Holders

After many inquiries I am writing down one way to make the guitar pick holders;)

You will need:

  • yarn - I like Hobby Lobby's I Love this Yarn
  • Crochet Hook between E/4 and G/6
Ch 5, then sl st in original ch to make a loop
Rnd 1: Ch 3, dc 14 into the middle of the loop (not inside the chain, but the hole), sl st in top of ch -3 to  close (it will be slightly concave)
Rnd 2: Ch 2, sc in next st (front loop only), and all the way around (front loops only), end with a sl st into the top of your ch st          
Rnd 3: Ch 2, *(sc in next st (front loop only), fbftog next 2 front loops)* Repeat * to * around til you get to the beg, then sl st in ch to close
Tail: Ch 20, sl st in the base of the starting ch

To finish: ch 1 and pull, cut the strand and weave the extra yarn back in and glue=)
Voila!
Makes a great gift for the guitar lover that can't keep track of their picks, lol! You can fold it into itself to put on the neck of the guitar or make the last chain longer to attach to the strap. You can even attach it as a key chain! Great sentimental, thoughtful, handmade gift.

If you don't want to figure out how to make them, but would like them as party favors, or a Birthday Gift, you can order them today and we will make and ship them within 3 days.
Click here to order.

Thursday, January 31, 2013

Photoshoot with Agape Photography

Rasta Bonnet with soft Charisma Yarn

"Flower Bonnet with soft I Love this Yarn"


 Photos turned out fabulous from Agape Photography!
Thank you so much to Rachel and Ashton, her model! 
Makes me want to create more hat designs!
All products can be found at United Artisans of America in downtown Fort Mill, SC.
"Rasta Bonnet with Charisma Yarn"

"Flower Bonnet with I Love this Yarn"

"SunHat with I Love this Yarn" 

"La Fleur Headband with Charisma Yarn"

"Flower Bonnet with I Love this Yarn"

Netted Scarf from Kathy

Beautiful Stamped Jewelry by Charis Creations

Elegant Crocheted Necklace

Stamped Jewelry

Butterfly Choker by Charis Creations


To make your own crocheted necklace, use your favorite ladder and and chain chain chain. I make 2 long strands of different lengths and knot them together. Voila!


To place an order to be shipped:
call 801-810-4066.
Thanks again to Rachel and Ashton for a job well done!

Friday, January 25, 2013

Revamping the Rear

Started by blocking with a colored pencil ;
natural sponge with 3 colors;
synthetic sponge damp to wipe...
We are working on revamping our rear store front and this is our fun process.

I went on youtube and found a cool Polish fellow that does amazing murals. I watched his one for stone and got the inspiration.
I then prayed fervently for an airbrush gun, and then last Saturday a gentleman listened to Holy Spirit and bought me an airbrush gun. So this past week my friend B.R. and I went to work...
This is our first mural so give us some grace, I didn't find exactly the colors Mr. Polish man listed on his video so I did some compromising.  But I like the result anyhow. And with grace and practice we'll get better and better.
What fun! So here is what we did.
Rubbed Hard on the top of the stone and the right
side to give them some 3 D look to it and blocked out space for windows.
Airbrushed blue into the sky because, it was my first time using an
airbrush, so I wanted to get used to it.
Then we airbrushed lines a light cream color for highlights...


Airbrushed dark shadows and used a jagged
cardboard piece to accent in the stone.
I added some white with  a hint of yellow with the airbrush for the clouds.
Do Over thoughts...
  • Use some sort of tool to make my lines straight... Lol I'm sure you can see the giant blocks verses the small. I also thought of using a rectangular cardboard piece to trace with colored pencil.
  • Some say to never use black in the way of art, so one can use raw umber or some dark brown color instead. I see be free=) But know what look you want to go for. 
  • I wish I had one of those laser tools that tell you where things are level for the windows too... They aren't exactly symmetrical, but its good enough for jazz...
Well I enjoyed myself, and I'm pretty sure B.R. did too! She is an amazing helper and I am so grateful... Because of her help this 10' x 17' wall was done in 6 hours.
So come on over to United Artisans of America and book your next meeting or party in Fort Mill in front of the wall;)


Sunday, January 20, 2013

Let's Talk About Love


...
Don't ya just love love?

Valentine's Wreath  Although the Saint Valentine stories vary, one thing is remaining... Love.


Calvary love, the love that doesn't have conditions, the love that forgives, extends mercy and grace, and looks like something.
There is a wonderful lady I heard speak a few times named Heidi Baker. She is someone I greatly admire, she is called Mama Ida to many many children in Africa. She says over and over "Love looks like something" and "Love the one in front of you". And her life shows this reality.


I used to be overwhelmed with the thought of loving too much, but breaking it down to loving the one in front of me really helps me keep on, keepin on in love.
It's there, now let's do it.
And so, let us love today, the one in front of us...
Evan Almighty's message: "Random Acts of Kindness" changes the world


Tuesday, October 30, 2012

Poly Mesh Wreath Fun!

Pumpkin Poly Mesh WreathSo, I love making Poly Mesh Wreaths and I am so grateful that June Ann walked into my shop and told me about them=)
Fun fun fun!!!
 Had a busy week making wreaths and had a great wreath class last week!
Merry Christmas Poly Mesh Wreath White and Green
Merry Christmas=)
Peace Blue Poly Mesh Wreath with Dove
Peace be da journey...

Purple Poly Mesh Love Wreath
Don't you just love, love?

Harvest Blessing Curly Poly Mesh Wreath
Harvest Blessings

Purple and Copper Poly Mesh Wreath
Copper and Purple


If you want a future class check out this meet-up for the Fort Mill, SC and Charlotte, NC area...


What fun! These are some of my ideas... be free to post a link in the comments to yours!!=)